

An audio video cable for home theater is never one cable. It is a chain of four or five segments, and each segment fails for a different reason: a display that will not hand audio back to the amplifier, a hum that appears only when the aerial is plugged in, a speaker run that dulls the top end over eight metres. Planning the chain segment by segment is faster than buying a box of assorted leads and hoping the right one is inside.
Map the Signal Chain Before Buying a Single Cable
Walk the room with a notebook before you open a catalogue. Three lists are enough to get the order right the first time.
- Devices and ports. For every box, write down each output and input it offers, not just the one you plan to use. A streamer with HDMI, optical and analogue out gives you three ways to reach the amplifier, and the cheapest one is often the analogue pair.
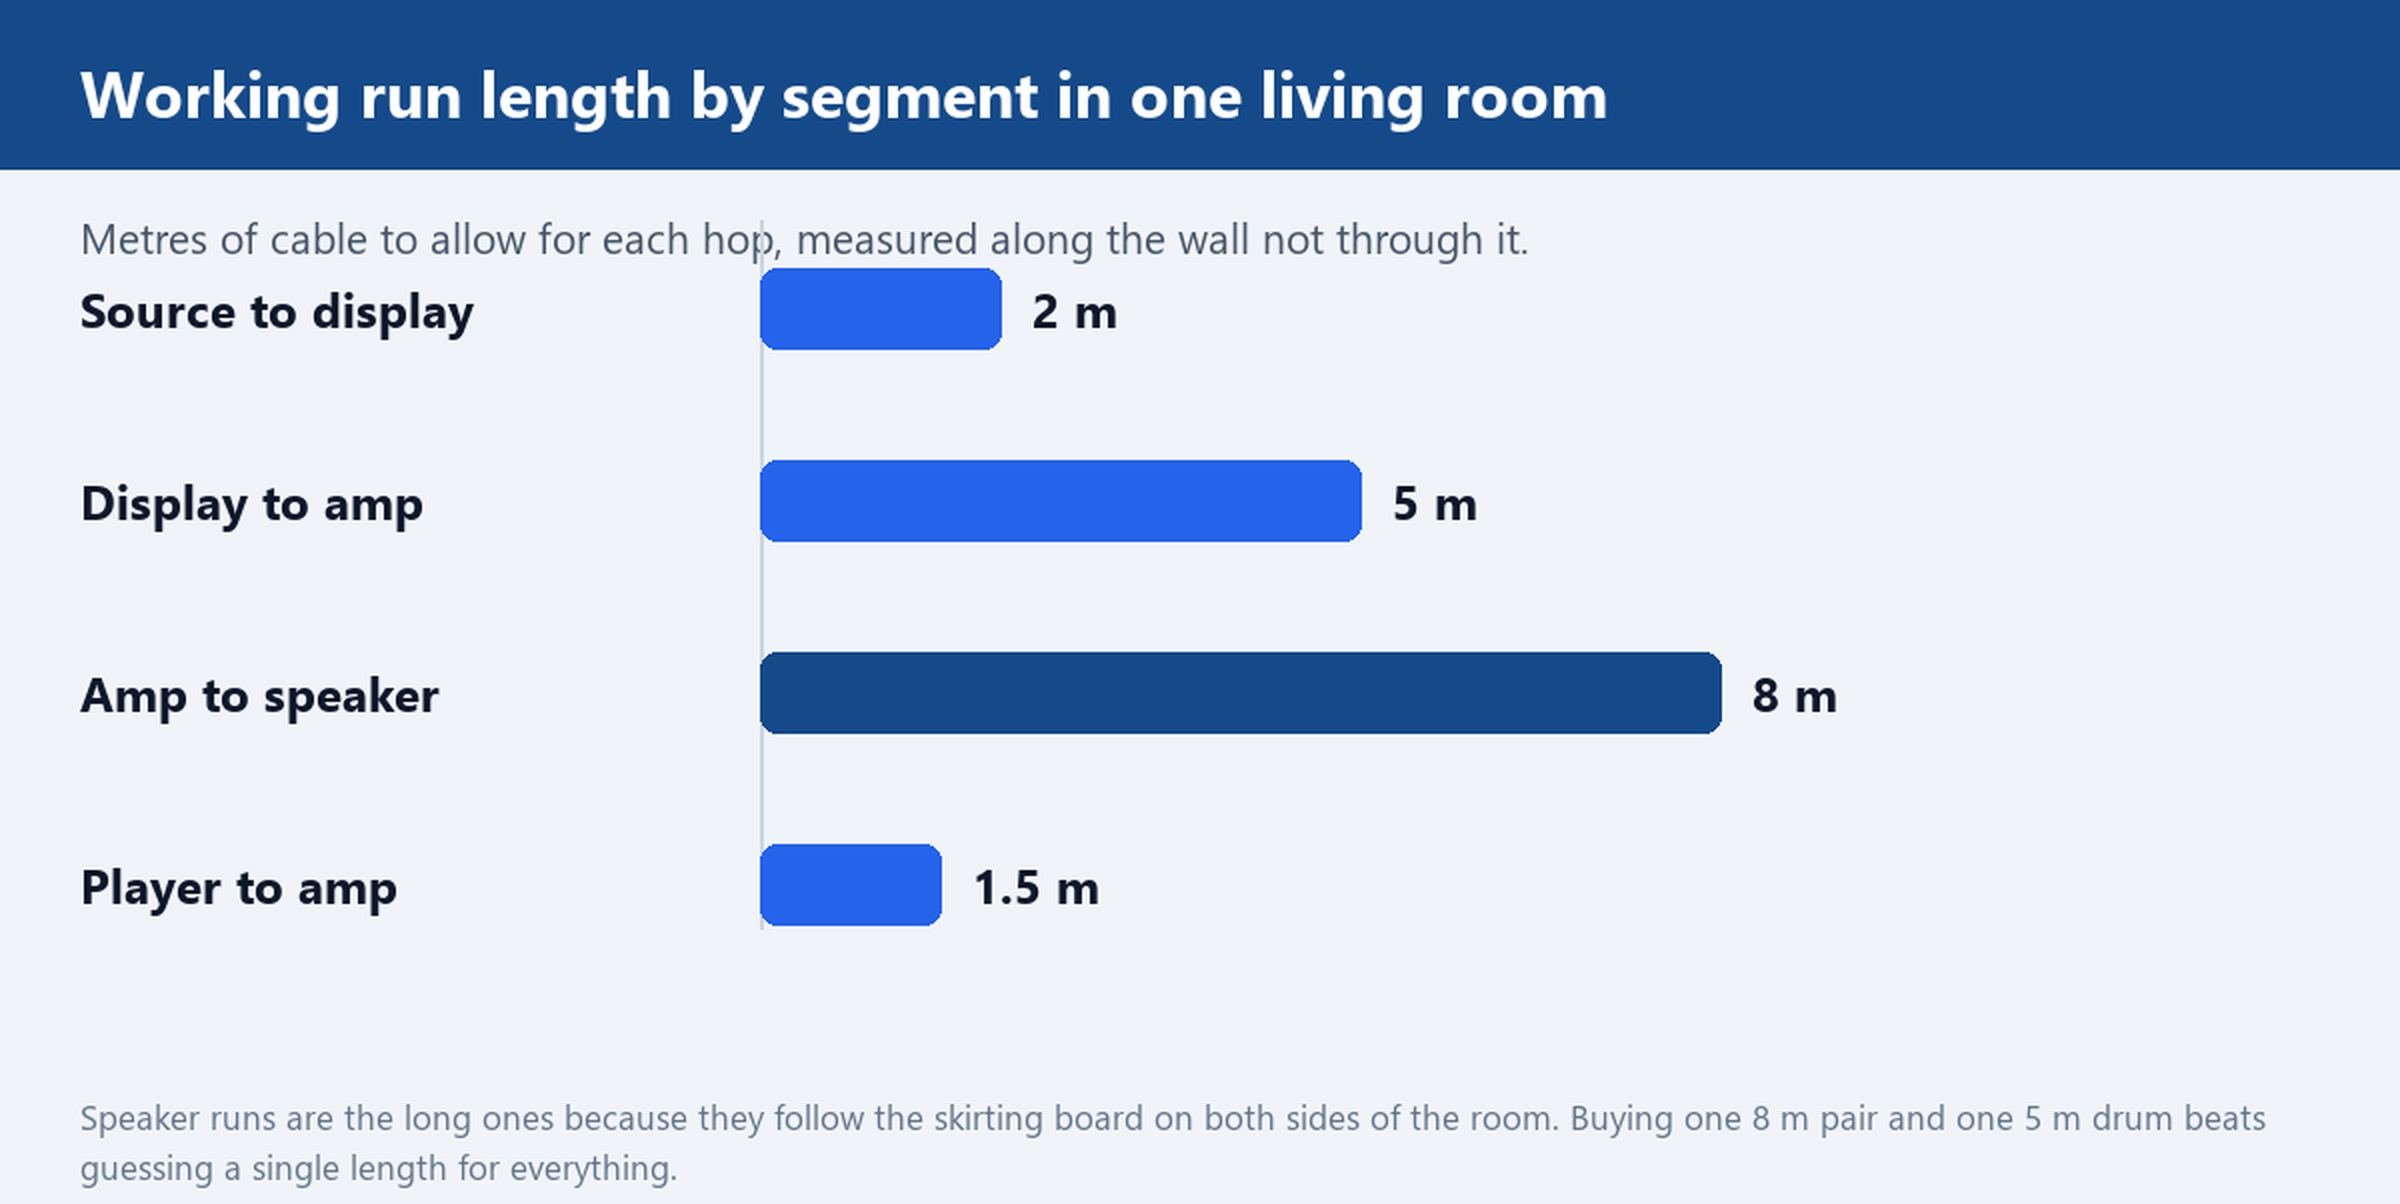
- Distances along the wall. Measure the path the cable will actually take, around door frames and along skirting, then add half a metre at each end for a service loop. A straight-line measurement is always short.
- Which device switches. If the display switches sources, every source needs a cable to the display and one cable runs back to the amplifier. If the amplifier switches, every source runs to the amplifier instead. Decide once, because the two layouts need different lengths and counts.
Only after those three lists are done is it worth looking at the audio and video cable range by segment rather than by product name.
The HDMI 2.0 Hop: 2160p, ARC Return and Where a Flat Profile Helps
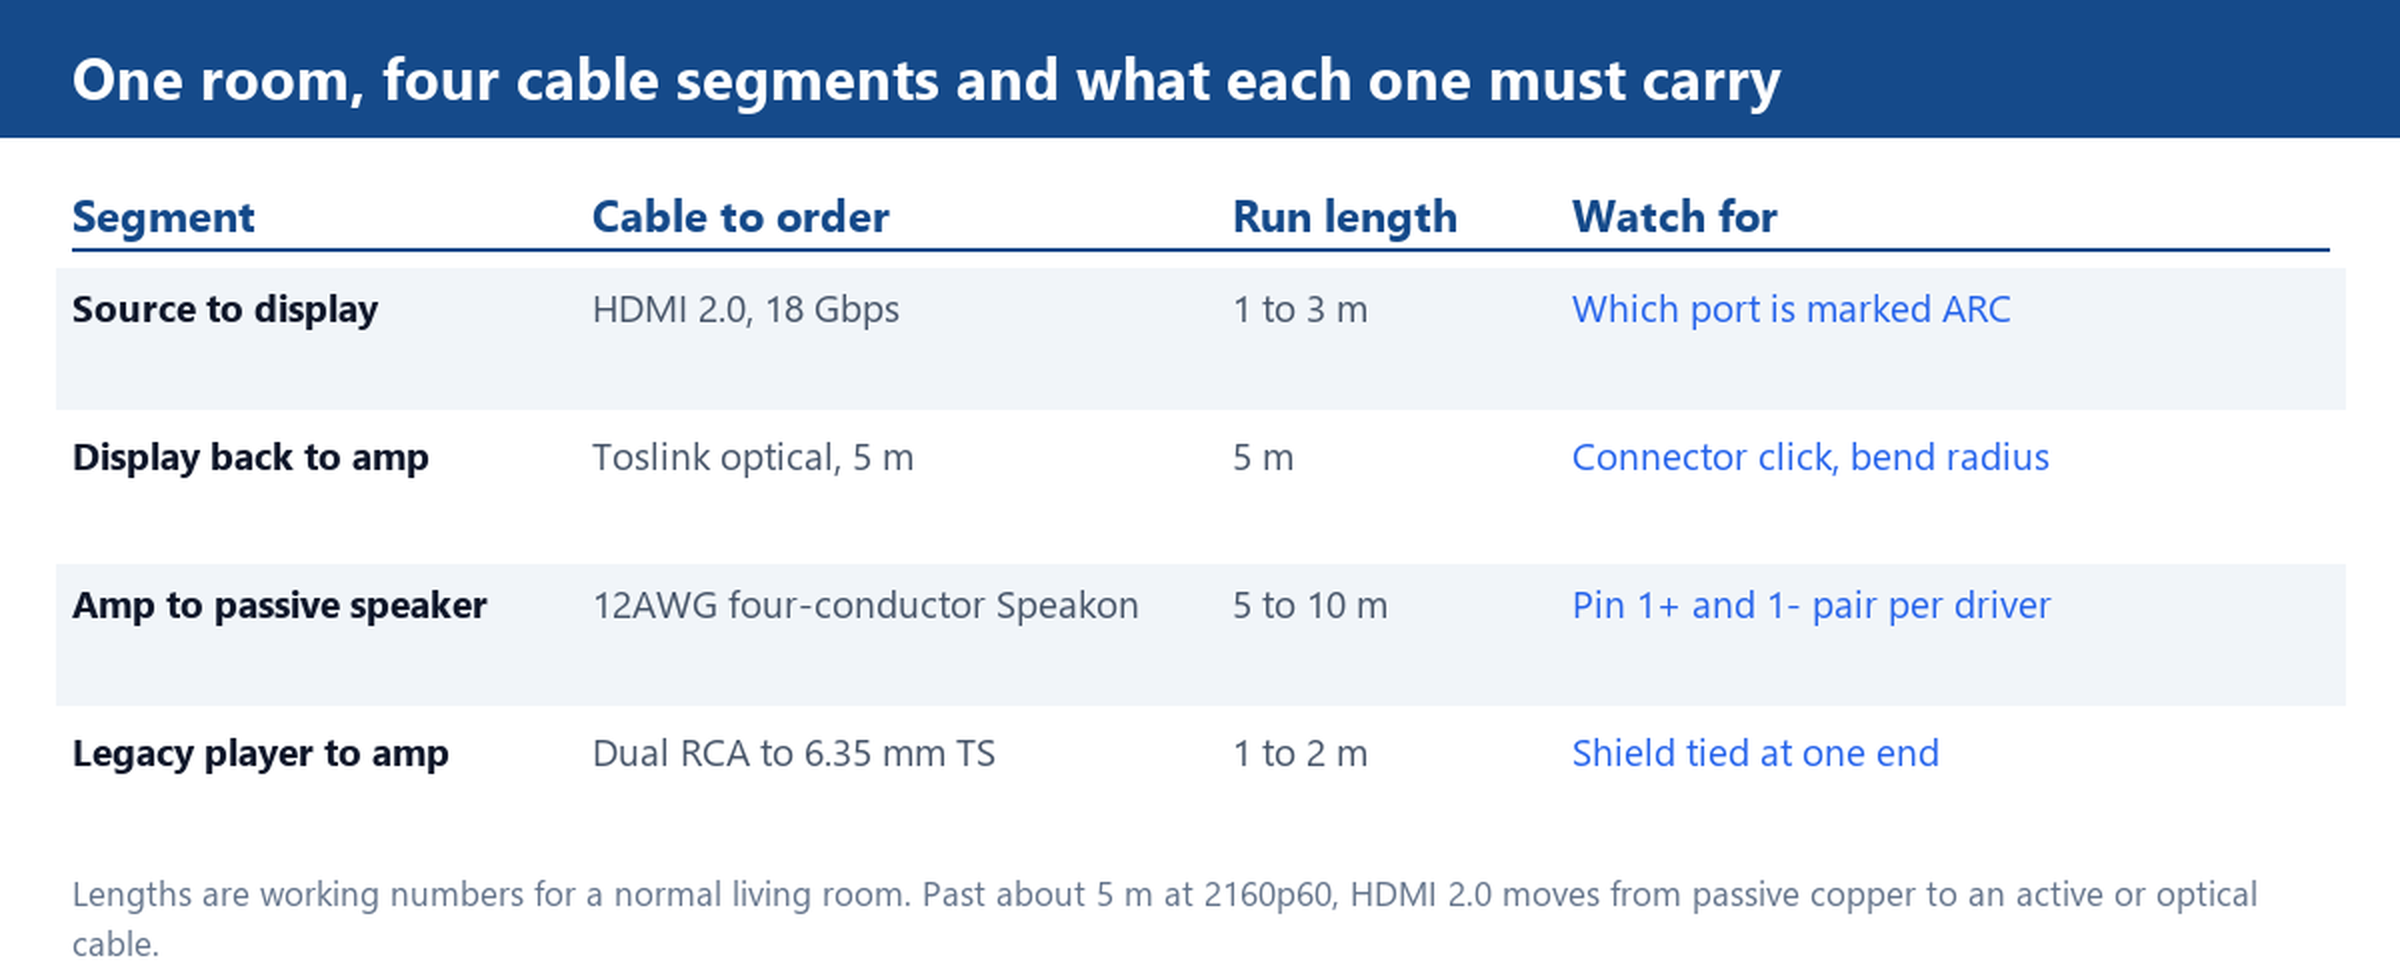
One HDMI cable usually does the whole display-to-amplifier job, provided the port on the display is the one marked for audio return. HDMI 2.0 carries 18 Gbps, which covers 2160p at 60 Hz with 4:4:4 chroma at eight bits per channel. That is the ceiling for a 4K living room display fed by a streaming box or a console, and a cable rated for the standard has headroom at that rate.
The audio return channel is the part that decides your cable count. With ARC working, the display sends the audio from its own tuner and apps back down the same cable to the amplifier, so a single run covers both directions. When ARC does not negotiate, the usual causes are a cable wired for the older 1.4 pinout, an input on the display that is not the ARC port, or a sound setting left on the internal speakers. Check the port label first, then the cable.
A flat profile cable is worth specifying when the run goes behind a wall panel, under a carpet edge or through a conduit that is already half full. The trade is bend radius: a flat jacket folds more easily than a round one, and a fold that kinks the foil shield shows up as sparkles on the picture at 2160p. Keep a gentle curve at both ends and leave the service loop outside the wall rather than inside it. Passive copper is reliable to about 5 m at this data rate; past that, plan on an active or optical cable instead of a longer passive one. The HDMI cable category lists the lengths and connector builds that suit each case.
Toslink at 5 m: Galvanic Isolation, Bend Radius and the Hum It Removes
Optical cable solves a problem that copper cannot: it breaks the electrical path between two devices. A display fed by an aerial or a cable box sits on a different ground reference from the amplifier, and that difference arrives as a steady mains hum through the speakers. A Toslink run removes it because there is no conductor to carry the current, only light.
Five metres is the working length for most rooms where the display and the amplifier sit on opposite walls. Plastic fibre at that length is fine for the data rate involved. Two mechanical details matter more than the specification: the connector has to click into the socket and sit square, and the cable must not be bent tighter than roughly a 25 mm radius, which rules out a sharp turn behind a wall plate. Test the run before the cable goes into the wall, because a Toslink that was pushed into a right angle often still passes stereo and drops the surround channels.
What optical does not do is carry an uncompressed multichannel signal beyond the older format limits. If the plan is lossless multichannel from a disc player, that segment belongs on HDMI rather than optical, and the optical run is kept for the display feed where its isolation is the reason it is there.
Amplifier to Passive Speaker: 12AWG Four-Conductor Speakon or 1/4-inch TS
Speaker runs are the longest cables in the room and the ones where gauge actually changes what you hear. A four-conductor Speakon cable carries two pairs in one jacket. Use one pair per driver for a bi-amp or bi-wire setup, or double the conductors into a single pair when the amplifier has one output per channel. The locking collar is the practical reason to choose it over a jack plug: nobody trips a Speakon out of its socket.
On gauge, 12AWG is the safe choice for runs of 5 to 10 m at 8 ohm, and it is what the long amplifier-to-speaker cables on this site are built from, such as the 12AWG four-conductor Speakon cable. Shorter runs under 3 m can use a lighter gauge without an audible penalty. The point is resistance per metre against the impedance of the load: the lower the load impedance, the more the same length of thin copper costs you in damping.
Where the amplifier end is a jack rather than a Speakon socket, a Speakon to 1/4-inch TS cable keeps the locking connector at the speaker end. Whichever build you order, write the pinout into the purchase order: in a four-pole Speakon, pin 1+ and 1- are the default pair, and a cable that swaps the pair on one channel inverts that driver against the other. The symptom is thin bass that disappears when you stand between the speakers, and it is a wiring fault rather than a room problem.
Legacy Inputs, Wall Plates and What to Leave in the Carton
A disc player, a turntable preamp or a cassette deck usually ends in a pair of RCA sockets, while the amplifier input is a 6.35 mm jack or another RCA pair. A dual 6.35 mm TS to dual RCA cable covers the first case and is short by design, because these sources sit next to the amplifier. At this signal level the shield is the part that matters: a shield tied at both ends can turn the pair into an aerial for the same hum the optical run was there to avoid.
At the wall plate, label both ends before the plate goes on and leave 300 mm of slack behind it. Keep speaker and mains cable in separate runs where they share a stud bay, crossing at right angles if they must cross at all. Two details save a call-back: photograph the connections before closing the plate, and test every segment with the devices in place before the furniture goes back.
Leave in the carton the adapters you have no device for. A shopping list built from the three lists at the start of this article is shorter than the assortment box, and every extra joint in the chain is one more place for a signal to stop.
Send your room layout with the device models and we will return a full cable list with lengths, connector types and one quote for the set. Custom lengths, jacket colours and mixed connector builds can be specified on the customize cable page before the order is placed.