

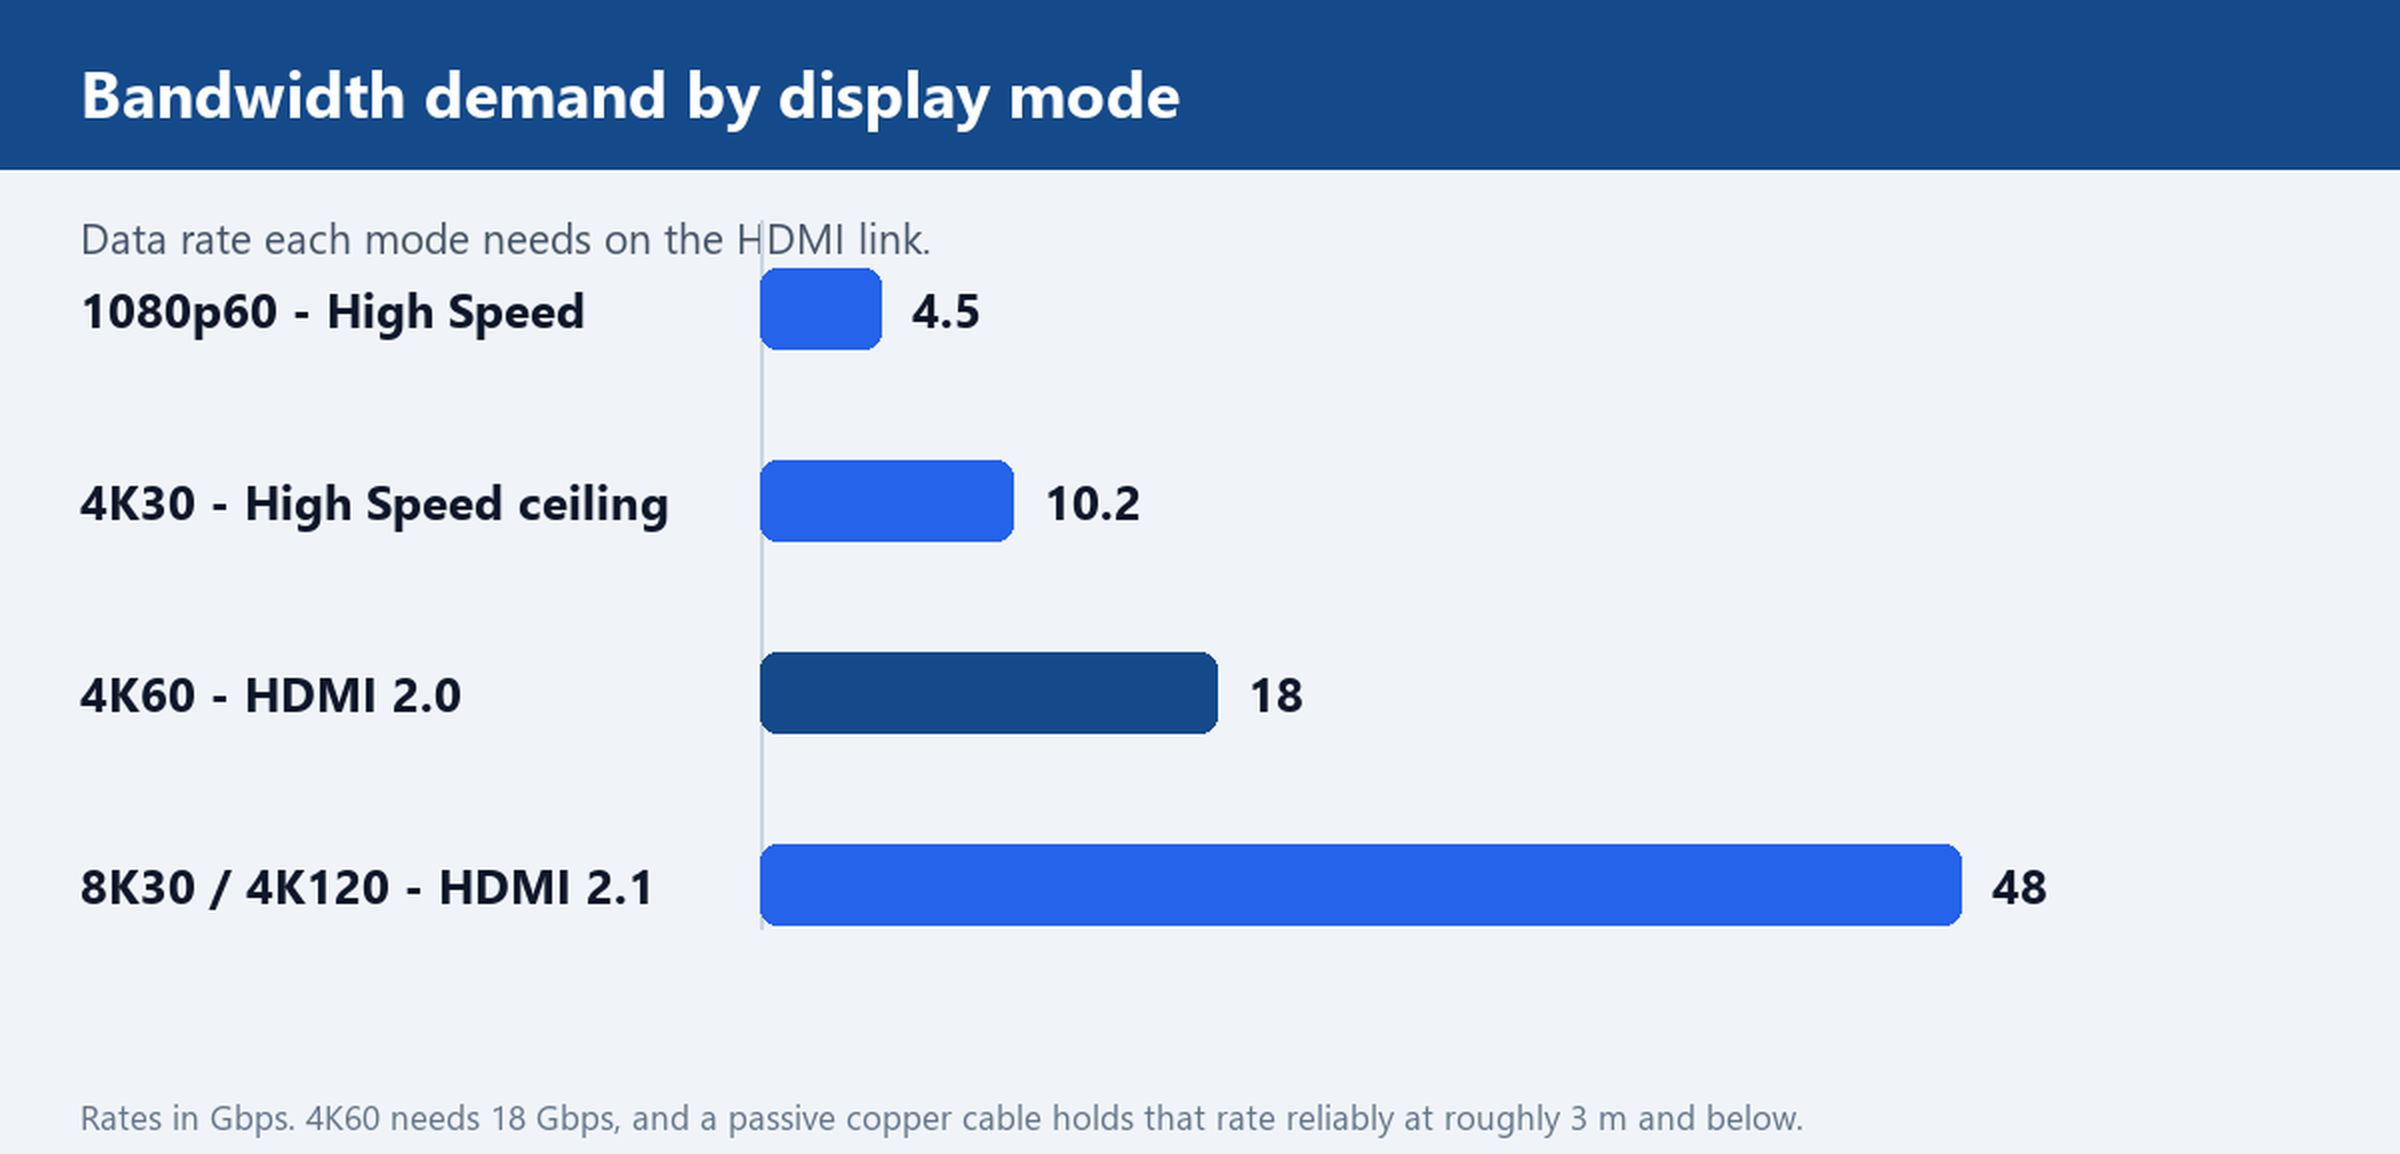
Most conference room HDMI problems are planning problems, not cable quality problems: the integrator buys one long generic cable and one extension, chains them somewhere above the ceiling, and the 4K picture drops out in the middle of a call. The reliable way to order an HDMI cable for conference room fit-outs is to treat the room as three separate runs, decide each one on its own length and resolution, and pick the connector form per segment. A passive copper cable carries 4K60, which needs the full 18 Gbps of HDMI 2.0, comfortably at 3 m and below; anything longer than that goes active copper or active optical fiber. The HDMI cable range covers all three forms, but they should be ordered as separate line items with the length of each run written down first.
Where the Length Actually Goes in a Meeting Room
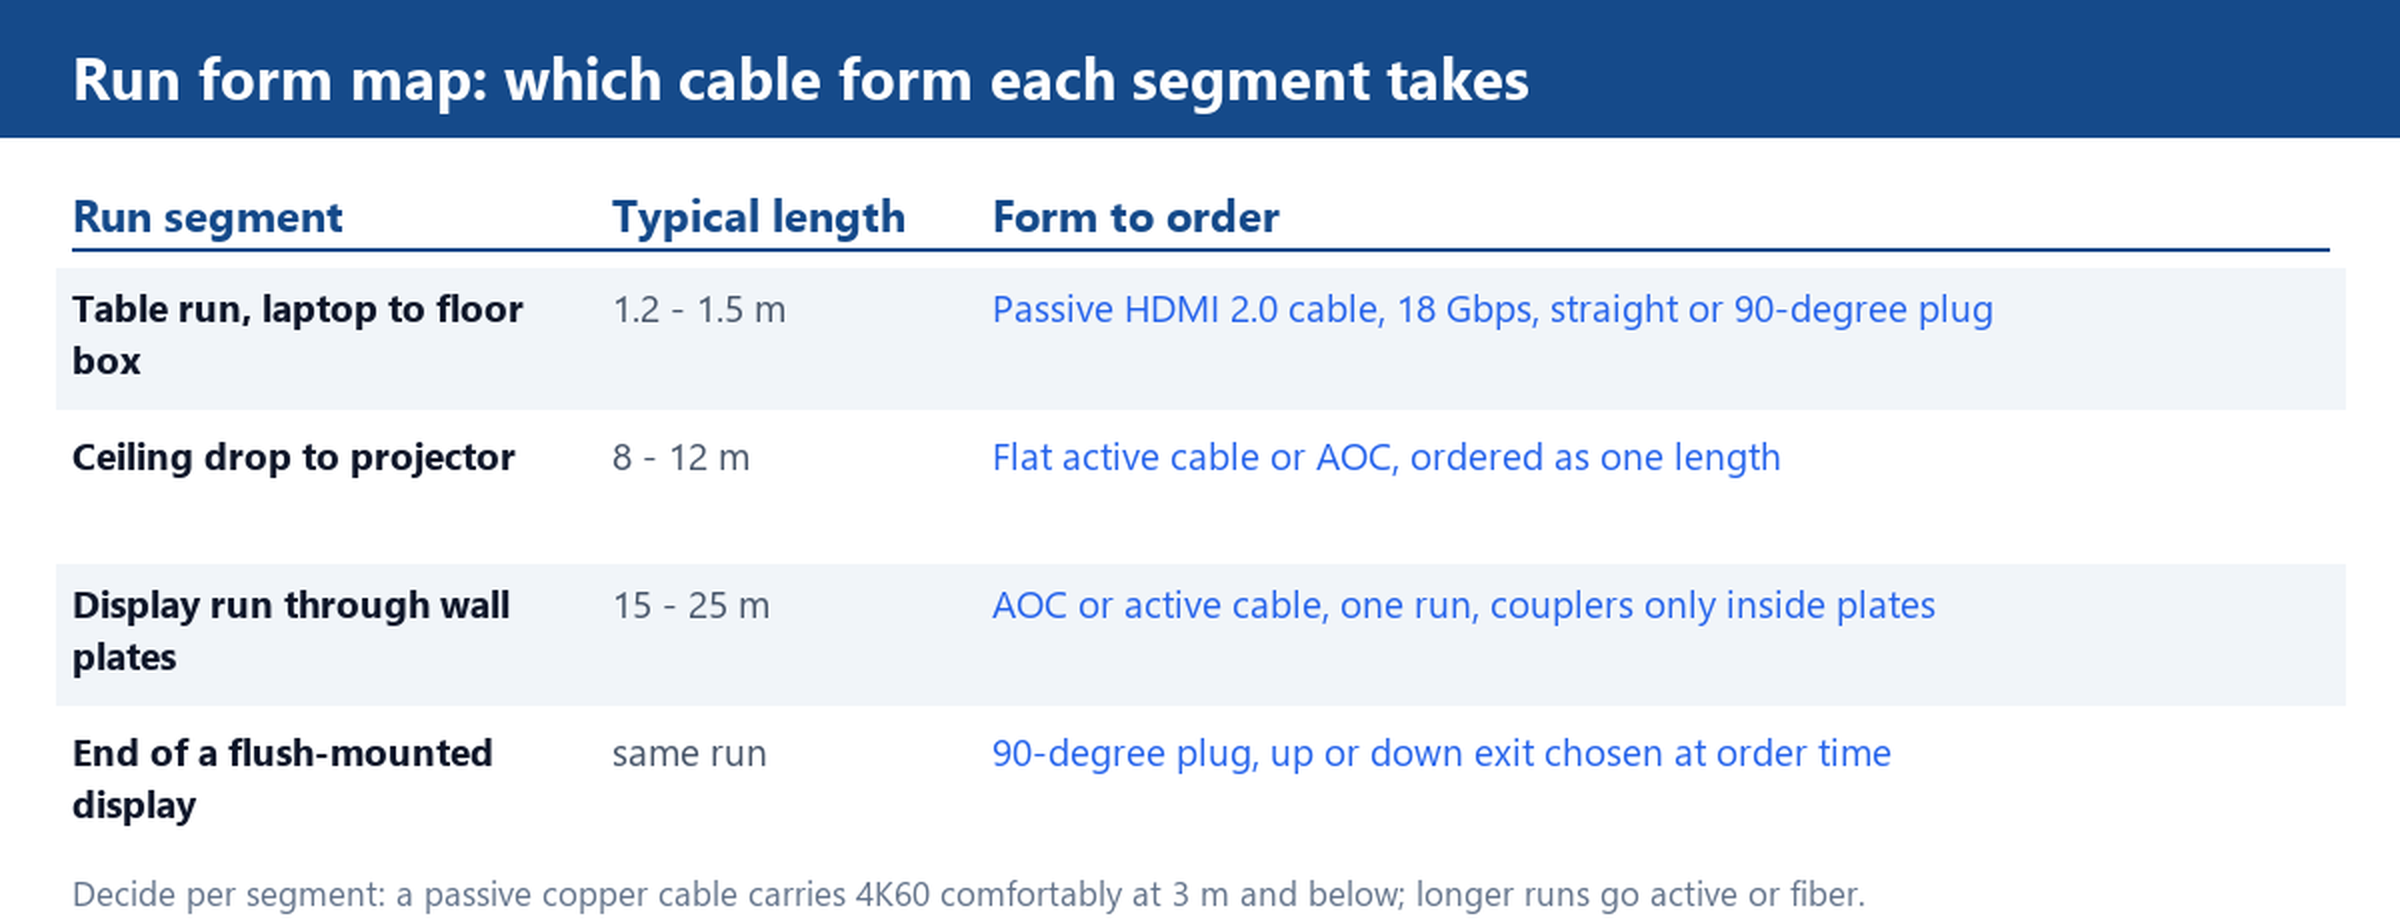
Walk the room with a tape before ordering anything. A typical fit-out splits into three segments. The table run goes from the laptop position or a table hub to a floor box or table plate, usually 1.2 m to 1.5 m. The ceiling drop goes from the projector or ceiling display down to a wall plate or floor box, 8 m to 12 m in a room of roughly 6 by 9 m. The display run goes between the source-side plate and the display wall plate, 15 m to 25 m depending on room depth.
Write each segment length down, and note the resolution at each endpoint, because resolution decides the bandwidth budget: 1080p60 fits inside about 4.5 Gbps, while 4K at 60 Hz, 3840 by 2160, needs the full 18 Gbps that HDMI 2.0 cables carry. The decision rule is then simple: any single run longer than about 3 m that must carry 4K60 should be an active copper or fiber cable; a room that runs 1080p only can stay passive up to roughly 10 m.
The 1.2 m and 1.5 m Table Run: Short Cable, Most Handling
The table run is the segment that gets unplugged, coiled and re-plugged every day, so connector survival matters more here than signal length. At 1.5 m a passive cable sits well inside its comfort zone even at 18 Gbps, so there is no reason to pay for active technology at this length. What to check instead is the strain relief moulding and the contact plating, because a table cable that fails usually fails at the plug shell where users yank it out.
Connector orientation is the other decision: a straight plug suits a recessed table plate, while a 90-degree plug suits a plate mounted close to a wall or under a media floor box where a straight plug would be pressed sideways. Keep this segment as one unbroken cable, with no couplers at all. A barrel joint in the most-handled segment of the room turns a daily wear point into two.
10 m Ceiling Drops: Flat Cable and Where to Put a Coupler
At 10 m the passive-versus-active question is settled by bandwidth, not preference: a passive copper cable does not hold 18 Gbps over 10 m, so a 4K60 ceiling drop needs either an active copper cable, which has a signal-conditioning chip at the display end and printed direction arrows on the jackets, or an active optical cable, which carries the HDMI signal over fiber and is commonly stocked in 10, 15, 20 and 30 m lengths. Many 10 m active copper cables draw their power from the 5V line inside the HDMI connector, but some need a USB power pigtail at the display end, so confirm this against the projector port before the drop is closed above the ceiling.
Form matters during installation: a flat HDMI cable suits cable trays and narrow conduit because the profile sits flat and the stiff round overmould is avoided at the tray exit. If a joint is genuinely unavoidable, for example to keep a fixed ceiling segment separate from a replaceable plate-side segment, put it at a wall plate or floor box where it can be reached later, never mid-tray above the ceiling, and use a purpose-made HDMI extension section rather than two random cables joined by a loose adapter. Keep the whole path to a single connection point: every extra female-to-female join adds insertion loss and a reflection point, and the first symptom at 18 Gbps is white sparkles on the picture, then dropouts.
20 m Runs, Wall Plates and Right-Angle Ends at the Display
At 15 m to 25 m, order an active optical cable as one length and resist the temptation to chain a 10 m run with an extension and a coupler. Wall plates on both ends normally hold female-to-female coupler modules, with short male-to-male patch leads on either side, which keeps the long cable replaceable without touching the plates.
The display end is where right-angle connectors earn their place. A flush-mounted display leaves almost no room behind the panel for a cable to sweep out, so forcing a round plug into a tight bend cracks conductors at the connector over time. A 90-degree HDMI plug points the cable straight down the wall instead, and the range covers both up-exit and down-exit orientations, so check which way the plug should leave the socket before ordering. The same logic applies to routing: keep the bend radius at roughly ten times the cable outer diameter, so a 6 mm round cable wants about a 60 mm radius in the tray, and let the right-angle plug handle the last tight corner. Finally, remember that the moulded plug body, not the cable jacket, sets the widest point of the run: measure the overmould before ordering conduit, or specify a slim moulding on a custom build.
The Spec Sheet to Hand Your Integrator
One page, one line per run, is all the integrator needs. For each run write: the measured length, the resolution and its bandwidth demand, for example 4K60 at 18 Gbps; the form, passive, active copper or fiber; the connector orientation at each end; the coupler positions, which should be inside plates only; and the direction arrow check for active cables. Cap the whole room at one connection point per path and the system stays serviceable for years. When a room has an unusual plate layout, a non-standard length between stocked sizes, or a custom overmould for a shallow floor box, that is a build-to-order job rather than a catalogue purchase, and the Customize Cable service covers exactly that kind of per-length work. Send your room layout, the display resolution and each run length, and we will quote per length and ship a 1.5 m sample for the table run. Ordering steps are on the How to order page, and production photos from the line are on the Factory page.