

A battery swap takes fifteen minutes. The comeback takes a week: idle hunting, a radio that forgot its presets, windows that no longer auto-close, a transmission that shifts late while it relearns. None of that is a fault. The modules lost keep-alive power the moment the terminals came off. An OBD2 memory saver cable prevents it by feeding 12 V into the diagnostic port for the length of the swap. How to choose OBD2 memory saver cable therefore comes down to geometry rather than brand: which end touches the power source, how far that source sits from the port, and whether the plug actually seats in the vehicle.
Why a Memory Saver Is a Power Cable, Not a Diagnostic Cable
Both plug into the same 16-pin seat, and that is where the similarity ends. A diagnostic cable carries data: CAN high and CAN low on pins 6 and 14, plus whatever the protocol uses for wake-up and ground reference. A memory saver carries current. It uses the battery positive on pin 16 and the ground returns on pins 4 and 5, and it ignores every data pin in the connector.
That single fact drives most order mistakes. Buyers search by connector shape, compare by unit price, and end up with a cable specified for scanner traffic rather than for holding a live circuit. Two questions separate the two families before price enters the conversation: does the listing name the pin 16 feed, and does it state what the unit is not? A saver holds memory power. It is not a starting supply and not a charger. If a supplier describes the item as a jump-start cable, the description is wrong, and the internal conductor probably matches the description.
Because the load is a keep-alive, the current is small compared with a starter, and that changes what deserves attention. Conductor gauge matters less than contact quality at the 16-pin seat, the fuse protecting the feed, and whether the source end can stay energized for the whole swap. A thin cable with clean contacts will hold memory. A thick cable with a half-seated plug will drop it mid-job, and nobody finds out until the engine idles badly an hour later.
Lighter Plug at 1 m vs 12 V Feed at 3 m: Which Fits the Bay
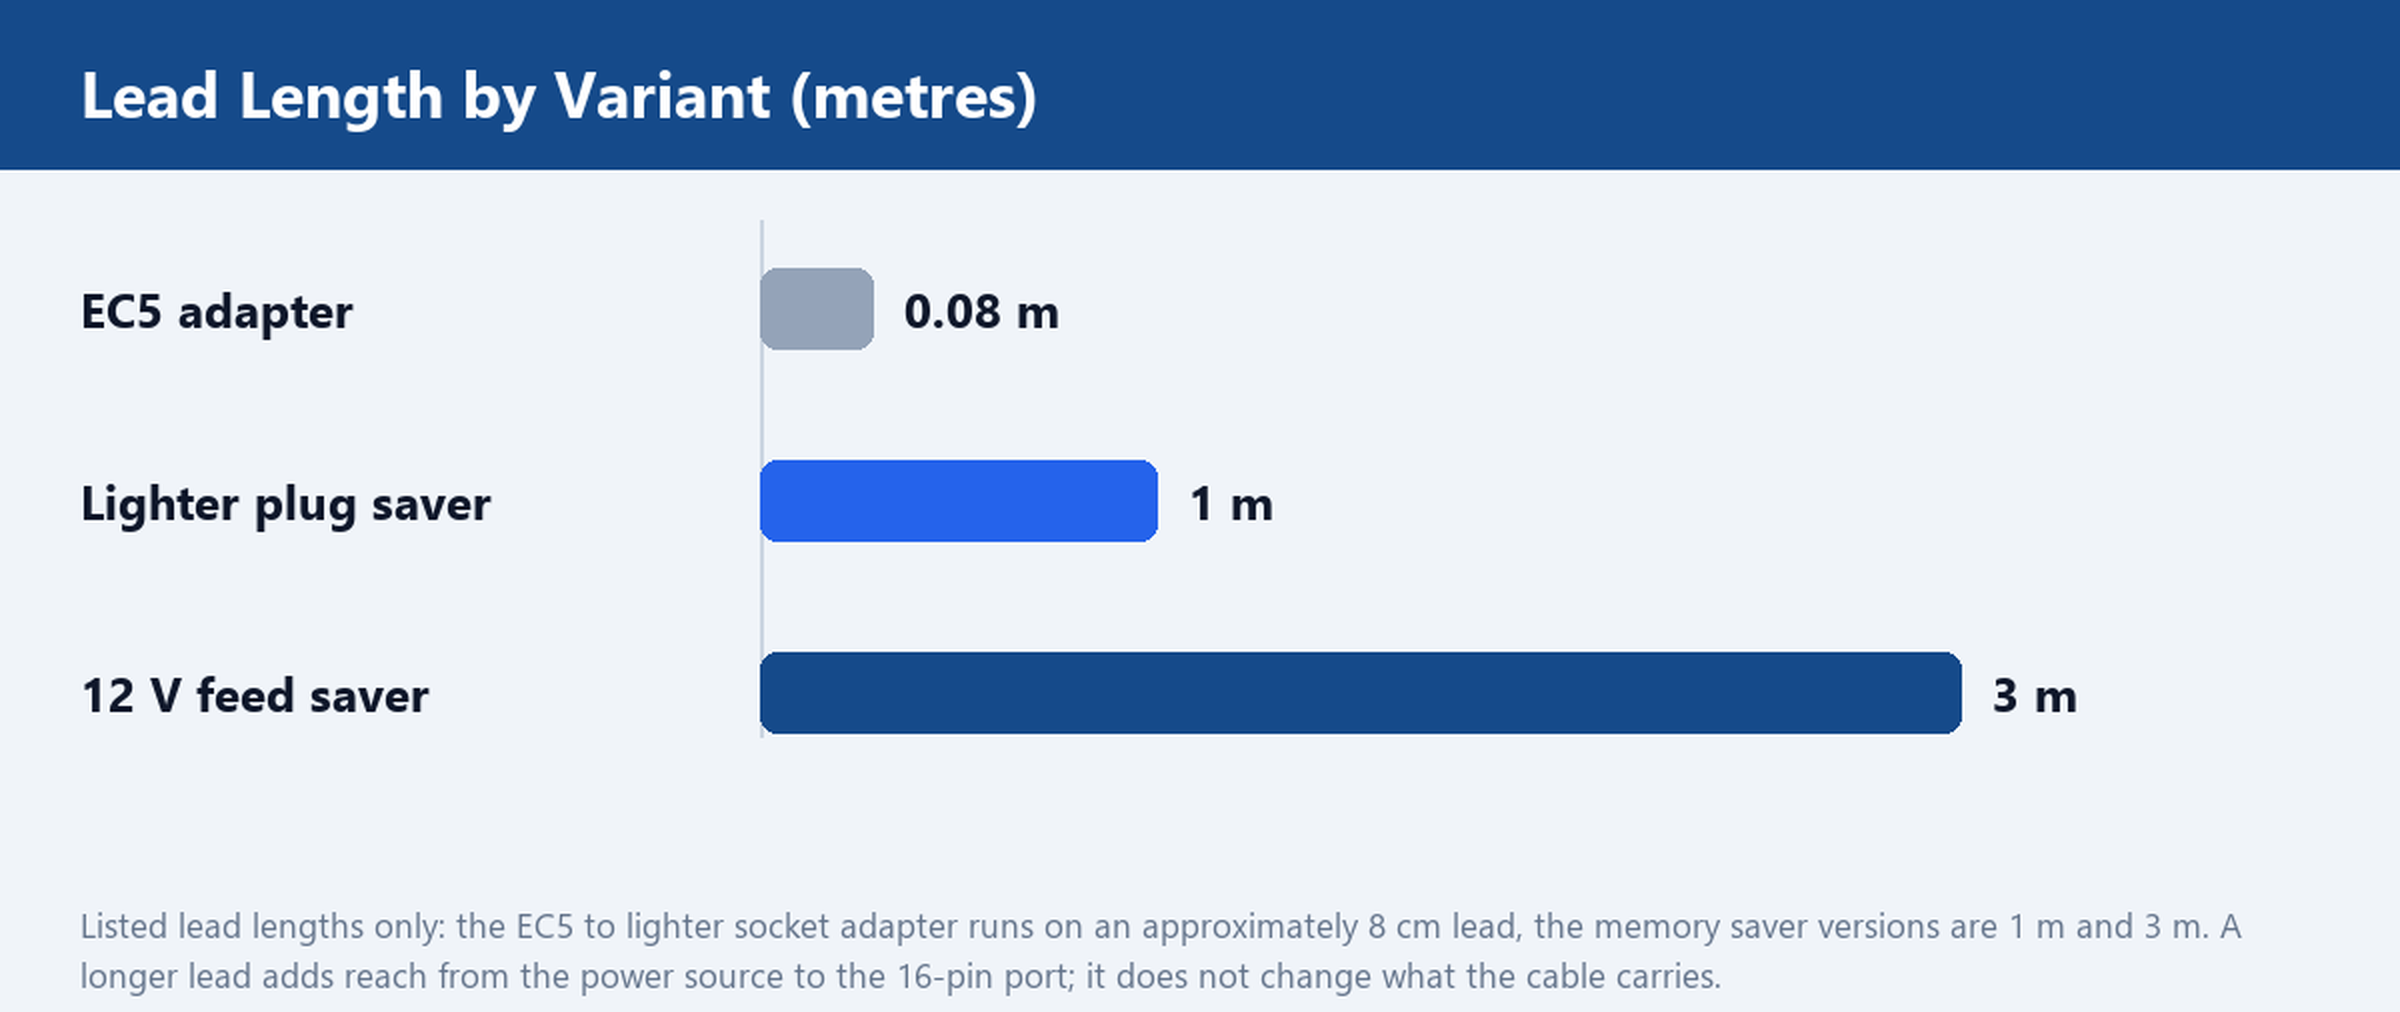
The range splits into two lead lengths for the same job, and the choice is geometry, not quality. The 1 m lighter plug version runs from a 12 V outlet to the 16-pin seat. It suits the case where source and port sit in the same cabin, which covers nose-to-tail parking in a tight bay and the usual arrangement of one technician working inside the car.
The 3 m version takes the same lighter plug as its input and gives three metres of lead to the 16-pin J1962 plug. That reach puts the source outside the engine bay: a second vehicle parked alongside, a trolley supply, or a jump starter sitting on the floor instead of on the passenger seat. Measure from where the source will physically rest to the port before choosing. A 1 m lead that has to cross a door sill and a seat rail is already at its limit, with the slack used up.
Two source-side checks belong in the same decision. Many lighter sockets are ignition-switched, so they go live only with the key in accessory or run: the donor vehicle has to be switched on and left on, and a socket that times out will silently end the feed. Second, the lighter circuit in the donor car is fused for accessories, typically somewhere in the 15 A to 20 A range, far more than a keep-alive needs. The fuse that matters is the one inside the saver, and the listing should state its rating.
Alligator Clips, EC5 and the Jump-Starter Route
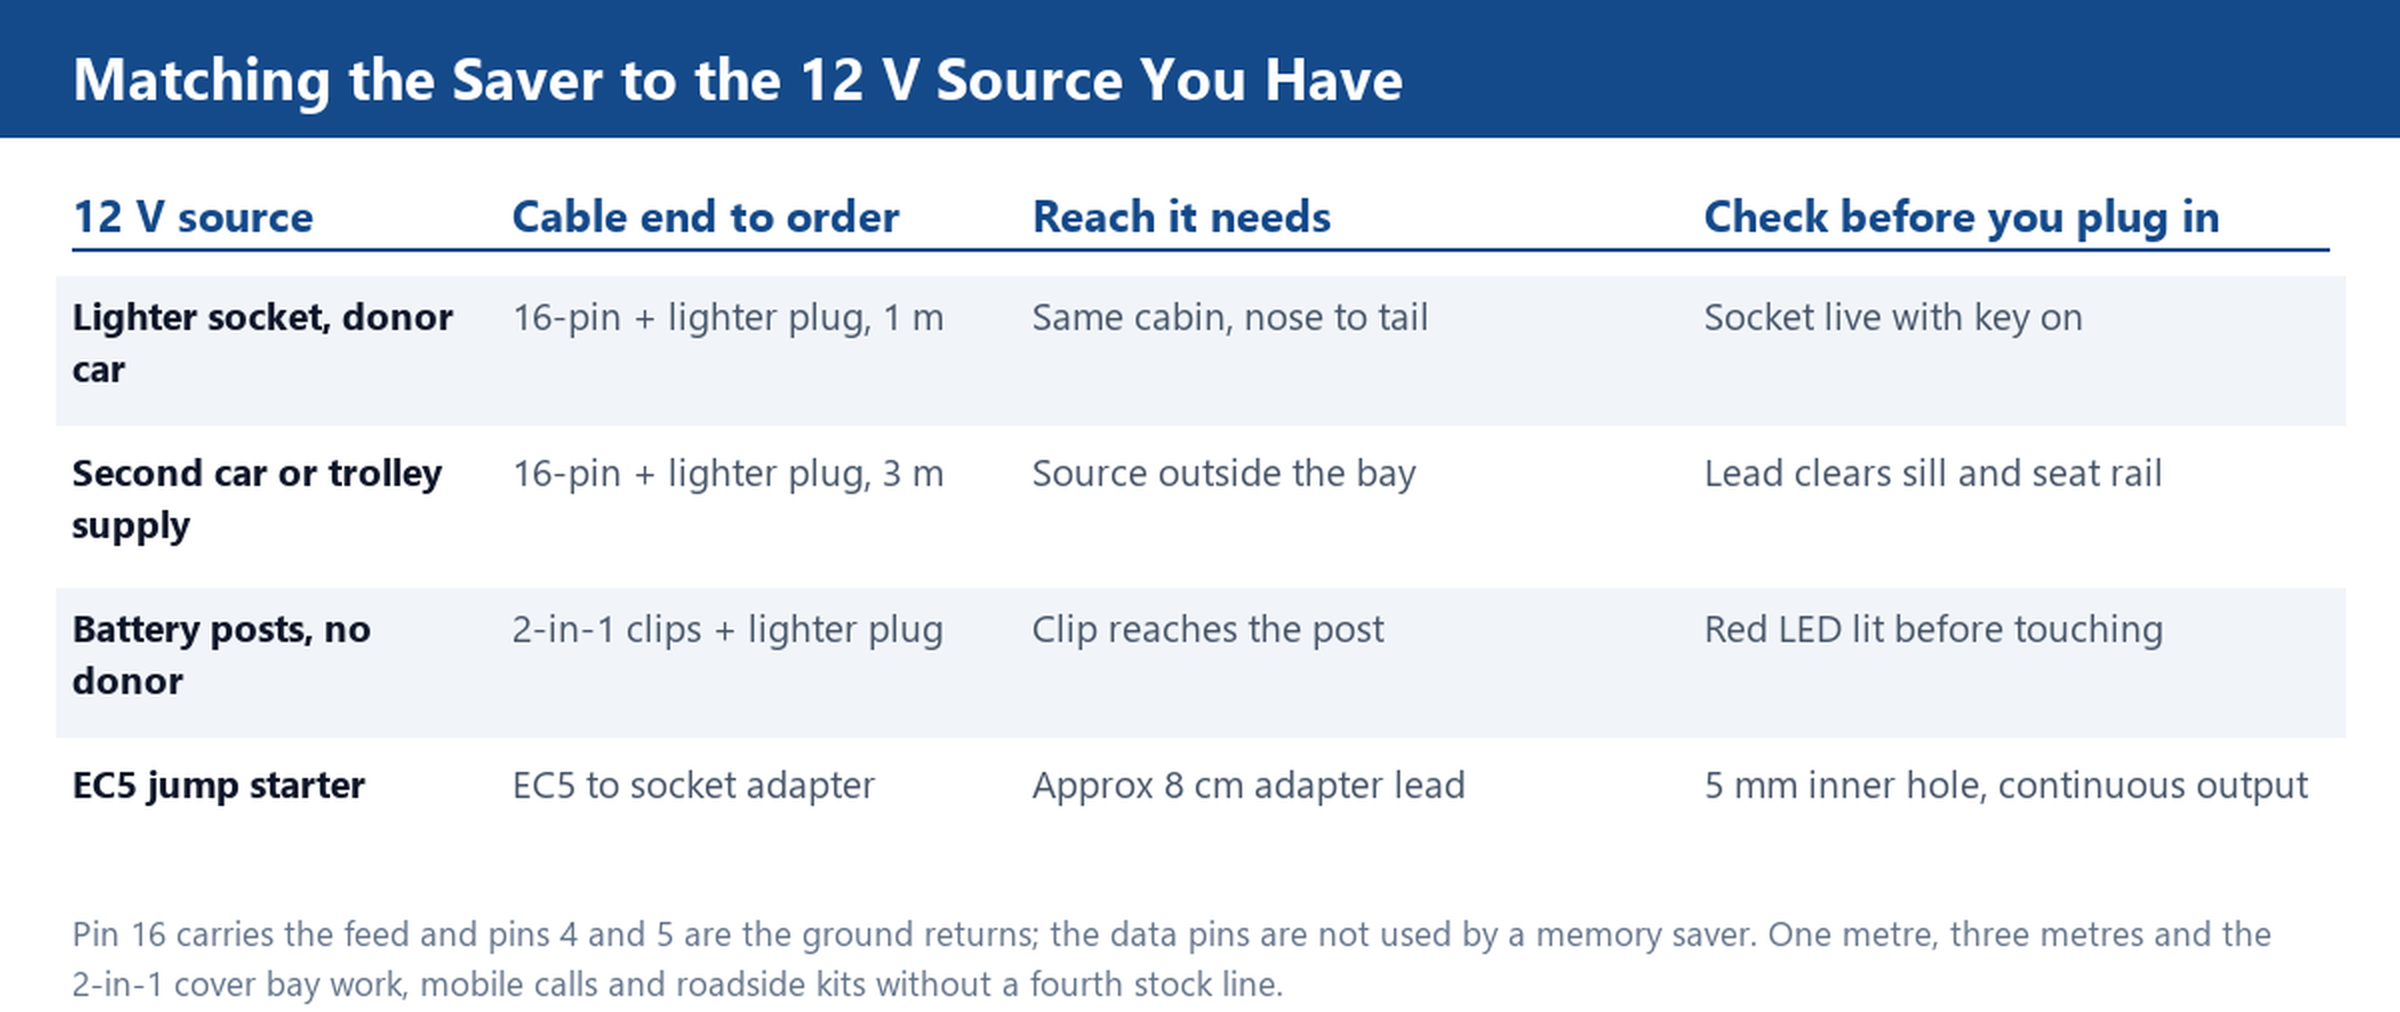
Where no donor car is available, the source becomes the battery posts or a jump starter. The 2-in-1 saver puts both options on one lead: alligator clips for the posts and a lighter plug for a socket, with a red LED that confirms polarity before anything reaches the vehicle. The LED is the go signal, and an unlit LED is information, not a nuisance: reversed clips, a dead socket, or poor contact on a jump-starter clamp. Fix the source first. Do not open the battery circuit to find out.
Clip hardware is usually a per-order option, which makes it a procurement detail rather than a marketing one. Ask for jaw opening and clip gauge in writing, because a heavier clip and a light-duty clip look identical in a product photo and behave very differently on a post that has been painted over or corroded. On vehicles where the posts sit under a cover, the clip body has to clear the recess, not merely grip the post.
The jump-starter route adds one adapter. An EC5 to lighter socket adapter takes the EC5 plug, which has a 5 mm inner hole, and presents a 12 V socket on a lead of roughly 8 cm. Confirm that 5 mm dimension against the booster before ordering, because EC5 housings differ between models. Then confirm the booster behaviour: a unit that energizes its output only while the boost button is pressed, and times out shortly after, is the wrong source for a battery swap. You need continuous 12 V output for the whole job. The adapter carries the socket and nothing more; the plug fuse on the appliance side remains the circuit protection, and the booster output rating sets what can run.
The 16-Pin Seat, Fuse Path and Polarity Checks Before You Plug In
The vehicle side is a 16-pin J1962 socket in a trapezoid shell, so the cable end that enters it must present pins. That sounds obvious until a shipment arrives with a socket on both ends, which happens when the listing describes the vehicle end only as 16-pin and never says male or female. Put the gender in the purchase order.
The electrical check takes a minute with a meter. With the source connected and the vehicle end still unplugged, measure between pin 16 and pin 4: the reading should match source voltage, and it should hold steady when the lead is flexed. On the 2-in-1, the red LED should be lit at the same moment. If voltage appears only when the connector is wiggled, the fault is in the lead and the sample goes back before it reaches a customer.
Then the sequence, which is the part technicians get wrong under time pressure: vehicle off, saver connected to the port, source confirmed live, and only after that the battery terminals off. The feed now runs through the vehicle harness, which means the disconnected battery cables are live and must be covered to avoid a short against the body. That is not a caution added for emphasis. It is the operating condition of every memory saver, and it is why the bench procedure needs to be written down instead of remembered.
An OBD2 pinout reference on the wall saves the argument about which pin is which, and the OBD2 technical resources page collects the rest of the family for the same bay.
What to Write on the Purchase Order
Five lines cover the specification: lead length, source end, vehicle-end gender and pin count, inline fuse rating, and whether a polarity indicator is included. Add packing, because these ship into roadside kits and gloveboxes where a card header versus a plain bag changes how the item sells at retail.
For a mixed fleet, a mixed line covers more ground than a single compromise variant. One metre for bay work with a donor car in the next slot, three metres for mobile calls where the source stays outside the vehicle, and the 2-in-1 for patrol and roadside kits where a live socket cannot be assumed. Three variants cover the work patterns without turning the stock list into a catalogue.
Before volume, run the sample through the sequence above on a real vehicle, using the exact donor or booster the technicians will use. A saver that passes on the bench and fails in a bay with an ignition-switched socket is a source problem that only appears in the field. Length, clip gauge and packing are set per order through the custom cable programme, which is also where retail packaging gets specified.
Tell us how your technicians will tap power, whether from a lighter socket, the battery posts or an EC5 jump starter, and the distance from that source to the diagnostic port. We will send the matching memory saver variant with a 16-pin fit check, so the first sample is the one that seats.