

This page answers how to choose SATA cable for a build or a bulk order, and the answer starts with the plug in your hand rather than the speed printed on the bag. Internal SATA leads look interchangeable until one carries thirteen pins where the bay expects seven, or a straight connector will not clear the side panel. Three decisions cause most returns: the connector body, the link speed, and the length and end style.
Short version: match the pin count to the drive first, treat 6 Gbps as an SSD question rather than a spinning disk question, and keep internal data leads at or under the one metre ceiling written into the SATA specification. The rest of this page is that reasoning in detail and a five point check to run before a bulk order.
Connector First: 7-Pin Data Against the Slimline 7+6 Body
A standard internal data lead is a 7-pin plug at each end. It carries the signal only; the drive takes its power from a separate connector. That separation surprises buyers who pull a 7-pin lead out of an old laptop optical drive and find a wider 13-pin socket waiting. The slimline 7+6 body combines seven data pins and six power pins in one moulded plug, and it belongs to the thin optical drives used in laptops and slim desktop chassis.
A third body shows up on full height desktop hard disks: the 7+15 combined connector, twenty two pins in one plug, carrying data alongside both the 5 V and 12 V rails. A 3.5 in disk needs that 12 V rail for its spindle motor, so a slimline 7+6 lead will not run one.
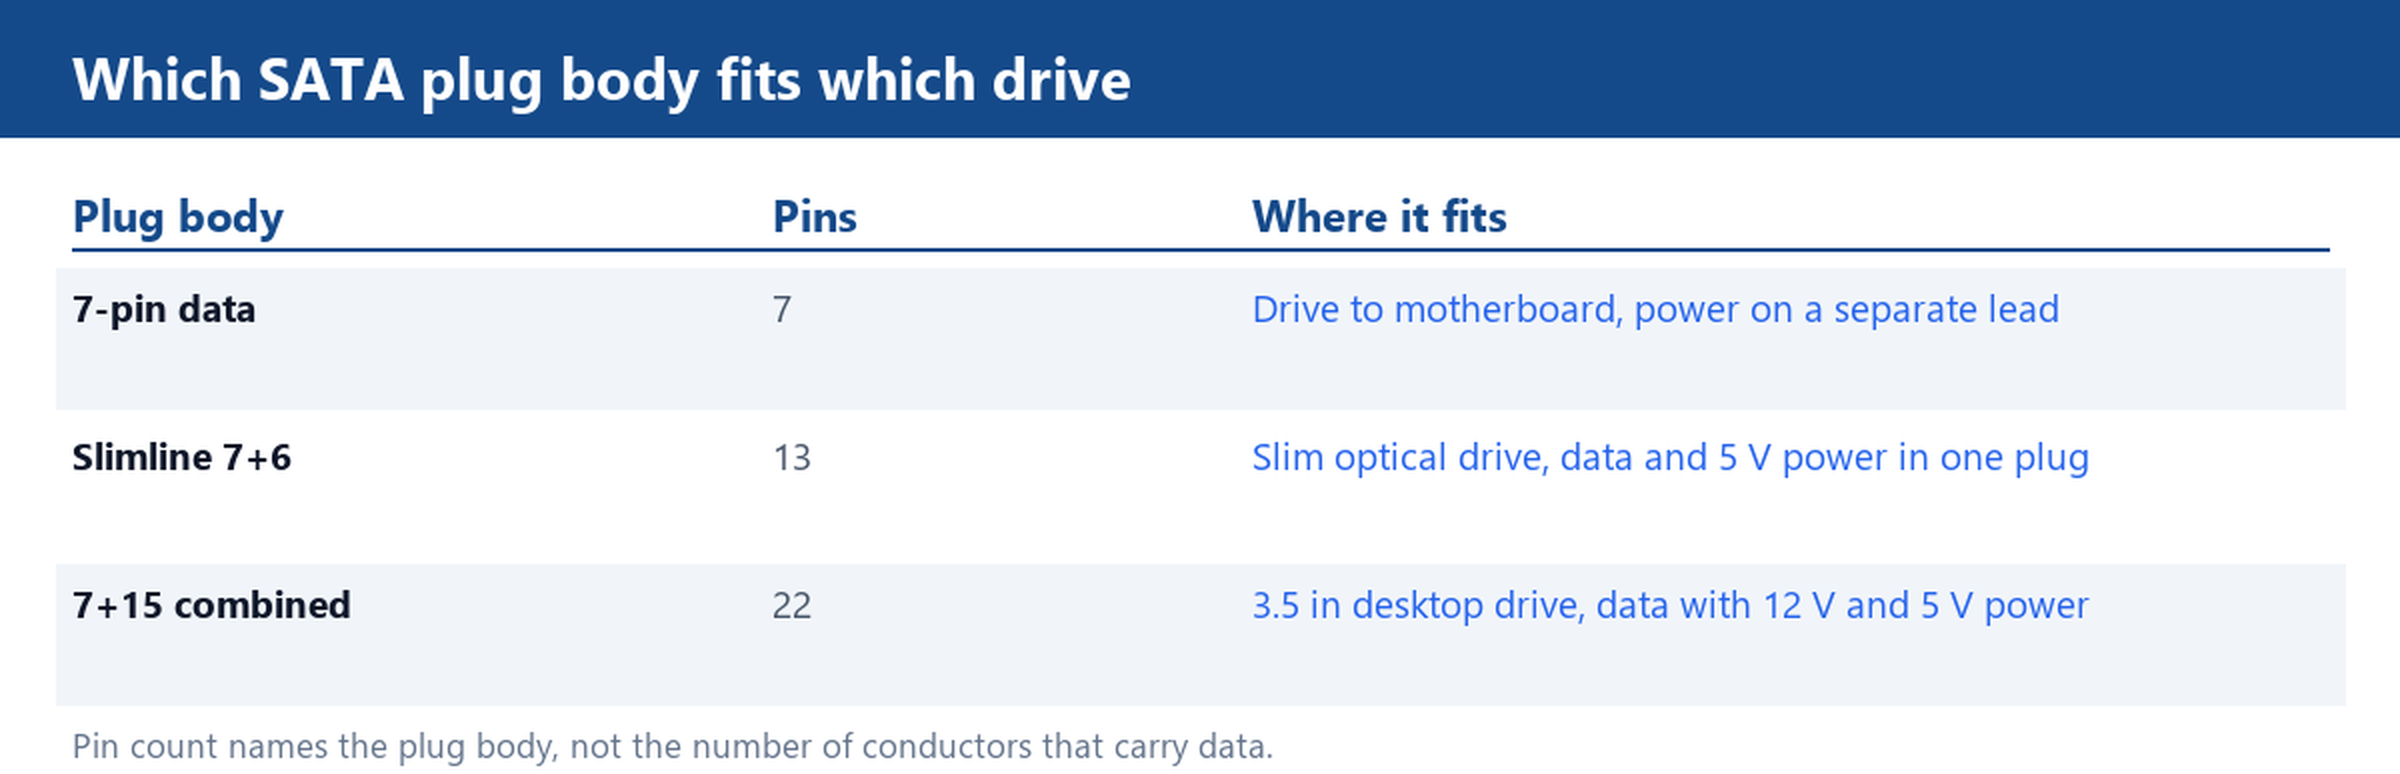
Read the socket on the drive and count the pins before ordering anything. A 10 cm SATA 3.0 lead suits a bench test or a drive mounted close to the board, and it is the usual choice when cable clutter is the problem. For a slim optical drive, the slimline 7+6 to USB 2.0 adapter cable turns the odd connector into a service port. Neither plug can be substituted by the other with a simple bend or a shim.
3 Gbps and 6 Gbps: What the Drive and the Bay Actually Negotiate
Speed is the second place where a bag label misleads. SATA sends data with 8b/10b encoding, which spends two of every ten bits on clock recovery. The arithmetic is simple: a 1.5 Gbps link carries 150 MB/s of payload, a 3 Gbps link carries 300 MB/s and a 6 Gbps link carries 600 MB/s. The printed link rate is the raw figure; the usable figure is eighty percent of it.
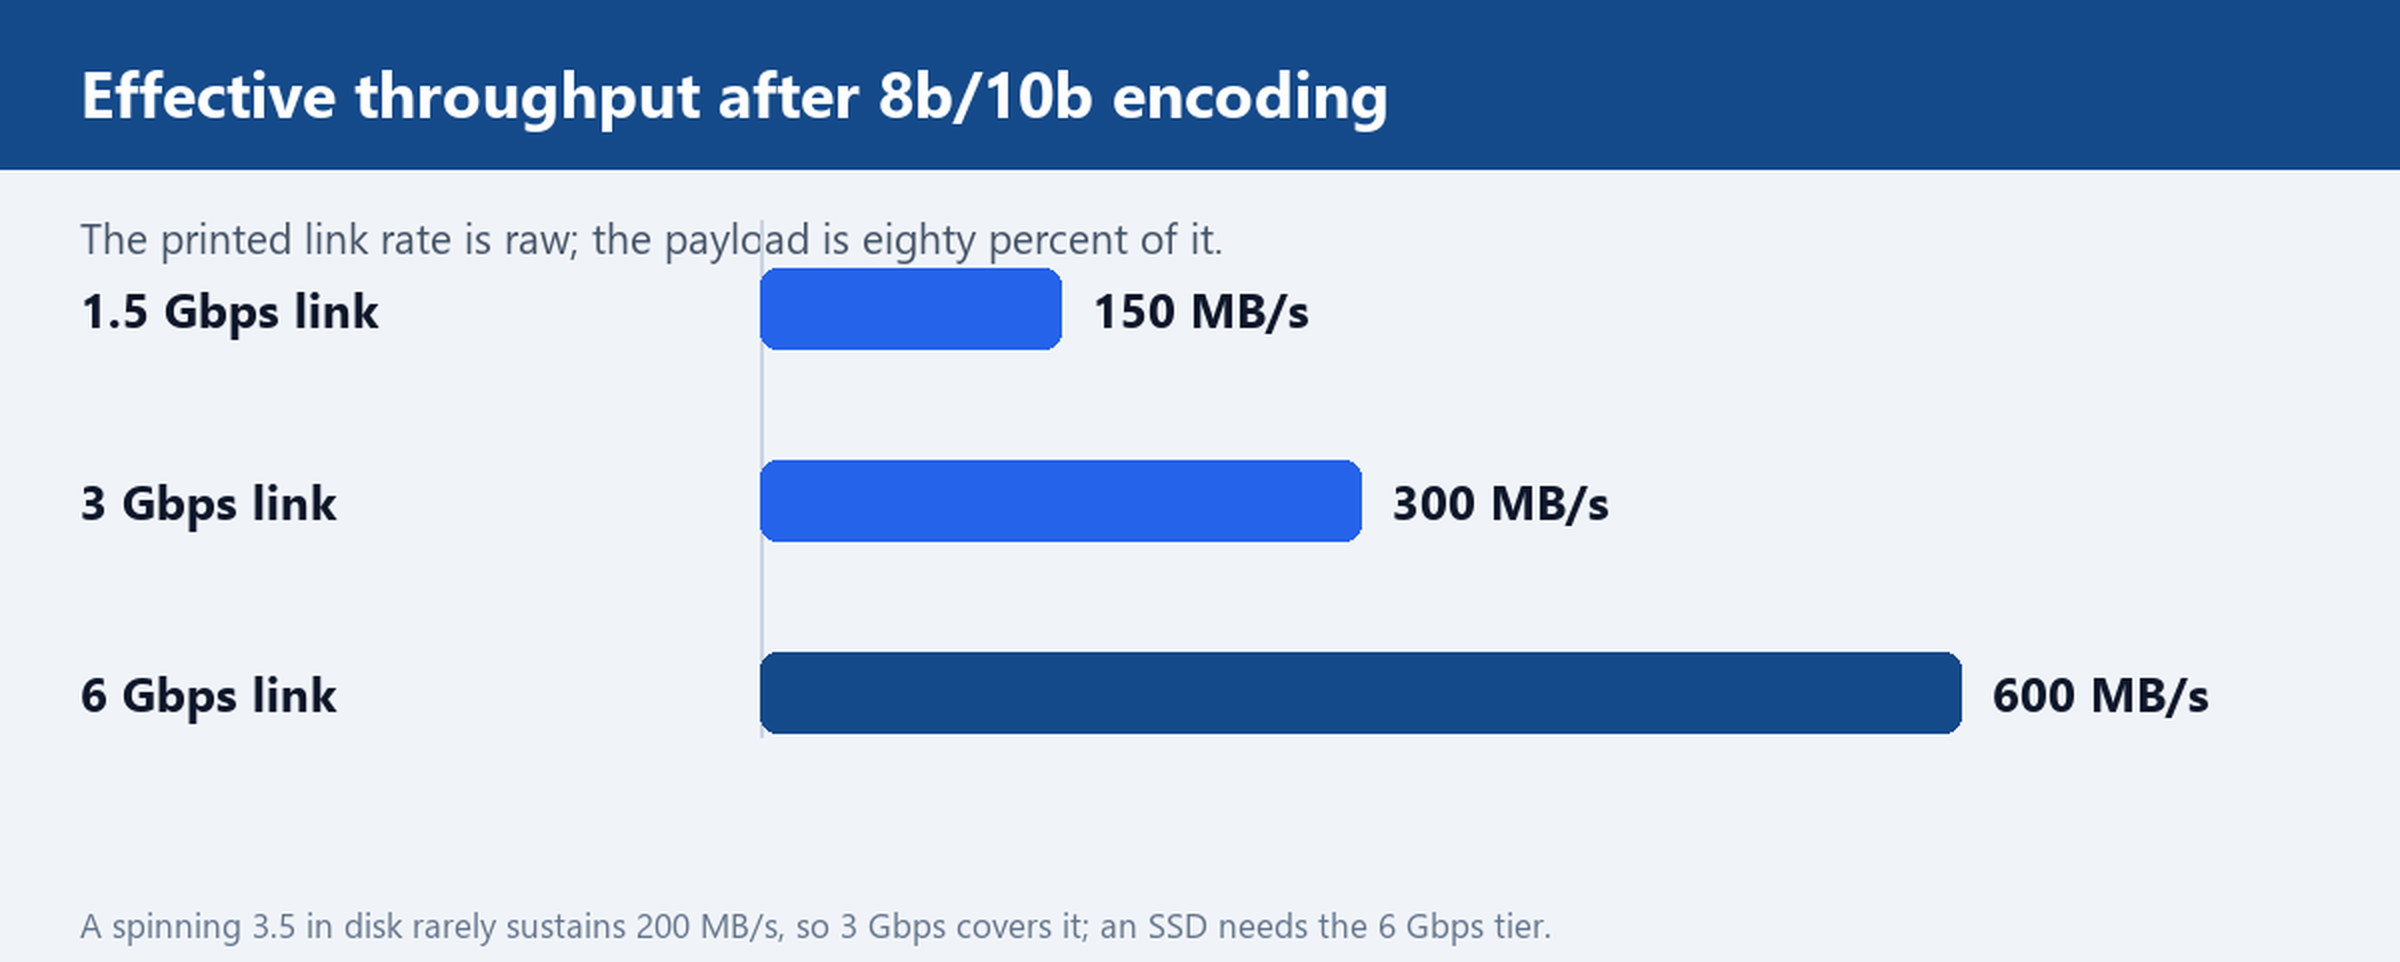
That puts the generations in perspective. A spinning 3.5 in disk rarely sustains more than 200 MB/s, so a 3 Gbps lead does not hold it back at all. A solid state drive will saturate 300 MB/s and then some, so 6 Gbps is worth specifying there. A 6 Gbps lead costs little more and works perfectly well with a 3 Gbps drive, because both ends negotiate down to the slower figure. The reverse is not true: a 3 Gbps lead will cap an SSD.
Do not read the generation as a claim about build quality. It describes the signalling rate the two ends agree on, nothing about shielding or connector retention. A well made 3 Gbps lead outlasts a poorly moulded 6 Gbps one.
Straight, Right-Angle and the Auto-Release Latch in a Tight Bay
The third decision is mechanical. A straight plug needs roughly 20 mm of free space behind the drive face before the jacket can bend. In a low profile chassis or a server tray that clearance is often not there, and a right-angle end turns the plug sideways so the cable runs along the board instead of into the side panel.
Watch the direction of the angle as well as its presence. A right-angle plug that points toward the drive carrier can foul a neighbouring bay, while the opposite orientation clears it. On units with an auto-release latch, the spring tab lifts the plug when you squeeze it, which matters when a drive sits deep in a rack and a fingernail cannot reach the clip. Check that the latch is accessible after the cable is dressed, not just before.
Length: a 10 cm Bench Lead Against 4 in to 40 in Runs
The SATA specification caps an internal data lead at one metre, about 40 in. That is a signal integrity limit, not a suggestion, and going past it invites intermittent link drops that are hard to diagnose because they only appear under load.
Within the limit, buy to the shortest length that reaches. A 10 cm SATA 3.0 lead keeps a bench setup or a closely mounted drive tidy and costs less. Tower builds commonly use 4 in, 7 in, 12 in and 18 in leads between a board and a drive cage; 24 in and 36 in appear in large cases where the cage sits far from the board; 40 in sits right at the ceiling and should be reserved for the runs that truly need it. Extra cable does not improve the signal. It only adds a loop to route and a place to snag.
Where a drive sits outside the case, use a purpose built adapter rather than extending an internal lead. The USB 3.0 to SATA and IDE adapter cable with its own supply is the right tool for a 3.5 in disk on a bench, because it provides the 12 V rail the drive needs.
Five Checks Before a Bulk SATA Order
Run this list against the sample before the purchase order goes out. First, count the pins on the real drive socket and name the plug body. Second, write down the link rate the drive actually negotiates and only specify 6 Gbps where an SSD needs it. Third, measure the free space behind the drive face and choose straight or right-angle accordingly. Fourth, pick the shortest length that reaches and stay inside one metre. Fifth, pull one sample from the production lot, plug it into the same bay and confirm the link trains at the expected rate without a retry.
The fifth check is the one buyers skip, and it is where a sample and a bulk lot can quietly diverge. If the sample is a 6 Gbps build and the production lot negotiates at 3 Gbps, the drawing and the purchase order did not say enough. Put the pin count, link rate, end style and length on the order line so the factory can be held to them.
Send your drive list and bay layout for a sample cable and a quote, or ask us to build a custom length and end combination to match your assembly. See our ordering guide for the details.